File Storage
The File component connects the form to a file storage provider and allows the user to upload, view, and manage files. Since <form.io> does not itself store files, we offer a range of 3rd party integrations to meet your File needs.
Azure Blob
The Azure Blob file upload system allows you to upload files from your hosted forms directly to an Azure Blob storage account. Here are the steps to set up this feature functionality.
Azure Portal
Before we begin, you must create or have an existing account within Microsoft Azure
Create new File Service
Once we are in the Azure portal interface, we will want to go click on Storage Accounts and add a new storage account.
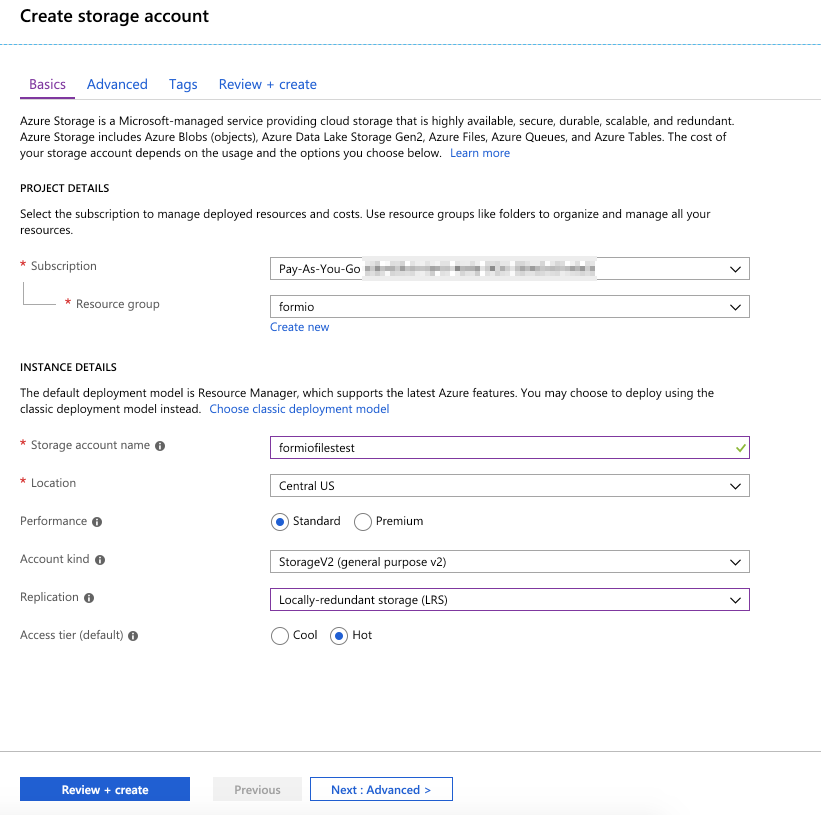
Next, click on the Create button to create the new storage account.
After this operation has been completed, we will now need to click on that storage account, then click on Blobs under the Blob Service section, then click + Container.
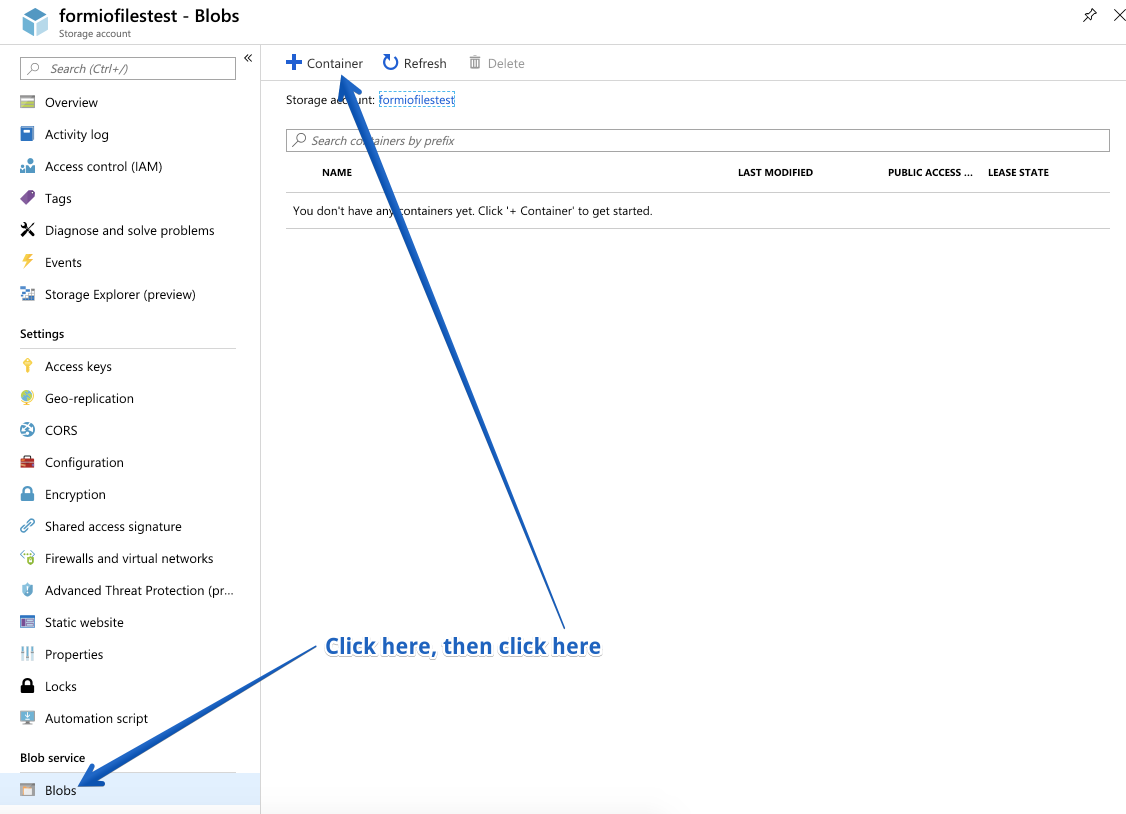
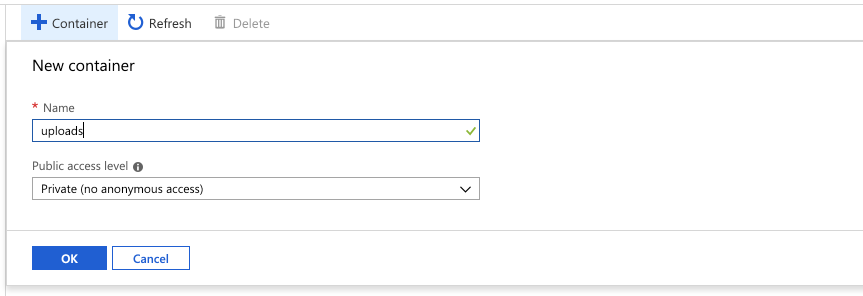
Next, create a new Container by clicking on +Container and then provide a name for your container.
Next, we will need to ensure that we can upload files from the domain of our application, to do this, we will configure the CORS section with the domain where we are hosting our application as well as Form.io portal. To do this, we will click on the CORS section, and configure the Blob Storage cors as follows.

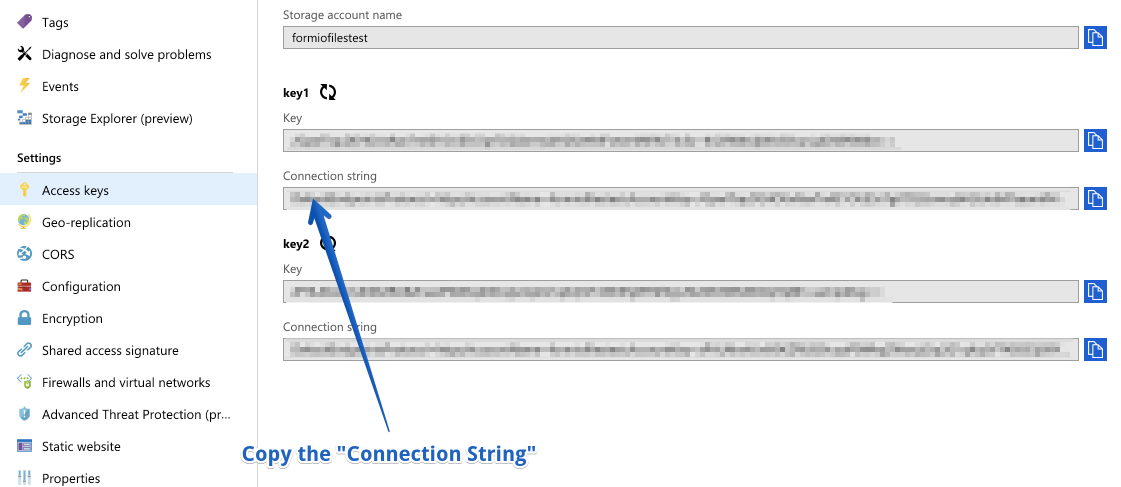
Now, we will click on Access Keys and copy the following credentials for use later.
Enter Azure Project Settings
On form.io go to your Project Settings page and Click on Integrations ❘ File Storage ❘ Azure Blob
Enter the information that you copied in the previous configurations as follows.

Save your project settings.
Now for every File component that you add to a form, you will need to select the Azure File Services Storage dropdown as follows.

Custom Url
Custom Url Provider does not have any settings in the Project Settings. Instead, it is set in the Url field on the form component when it is added to a form.
In order to use a Custom Url Provider, you will need to set up a service that can upload and serve files.
The information posted to the server will be
The server should save the contents of the file somewhere and return the following object.
You may return additional attributes if desired.
S3
The S3 Storage provider allows file storage and retrieval using any S3 compatible service but was specifically designed for Amazon Web Services S3.
For an on-premise compatible solution, try seaweedfs. See our seaweedfs installation guide.
If you haven’t already done so, go to Amazon Web Services and sign up for an account.
In order to use S3, you will need to configure an IAM user and an S3 bucket.
Create an IAM user
Go to Services ❘ IAM and click on the Users tab.
Click the Add User button.
Enter a user name such as “S3” and then click Programmatic Access, then click the Next button.
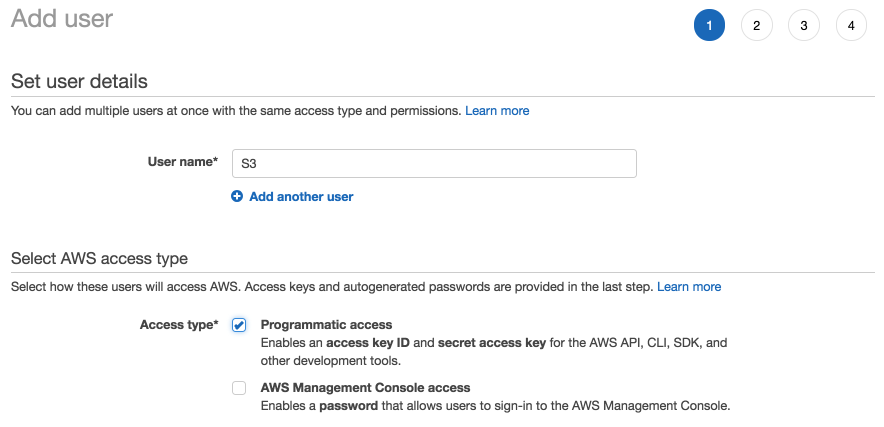
Skip the page where you add the user to a group.
On the last page, press Create User
On the next page, it should show you your access keys. You will need to copy those and add them to a note on your computer which you will need later.
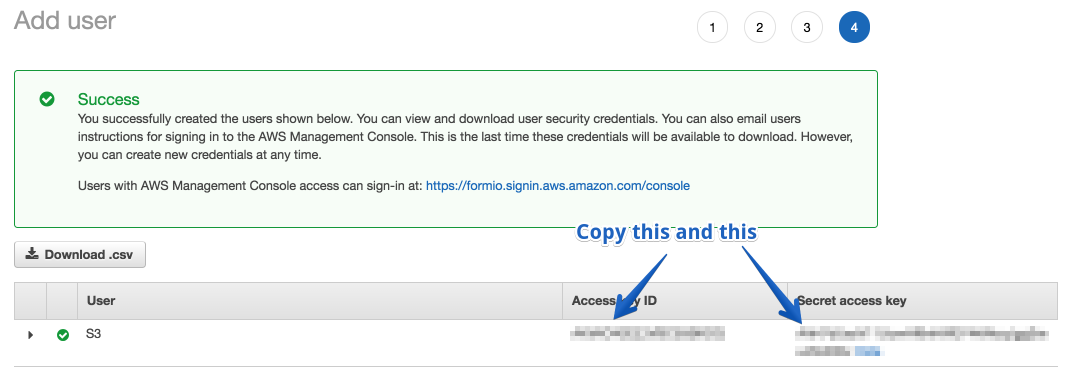
Now press Close button, which will take you back to the users list.
Find the user we just created and then click on their name, which will show you their Summary
Copy the ARN of that user and save it along with your Access Keys from earlier.
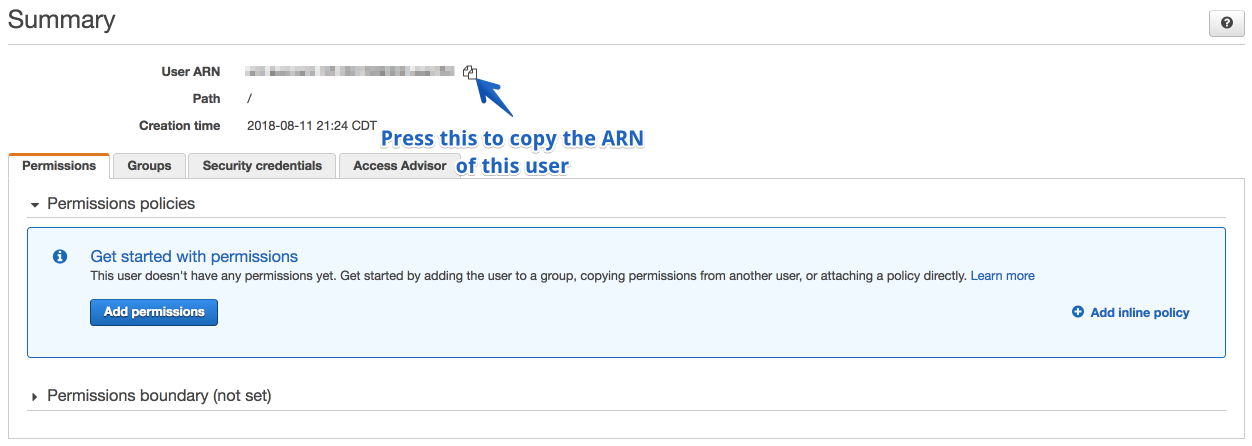
We are now ready to create the S3 bucket.
Create an S3 bucket
Go to Services ❘ S3
Click + Create Bucket and enter a name and region for the bucket and click Next
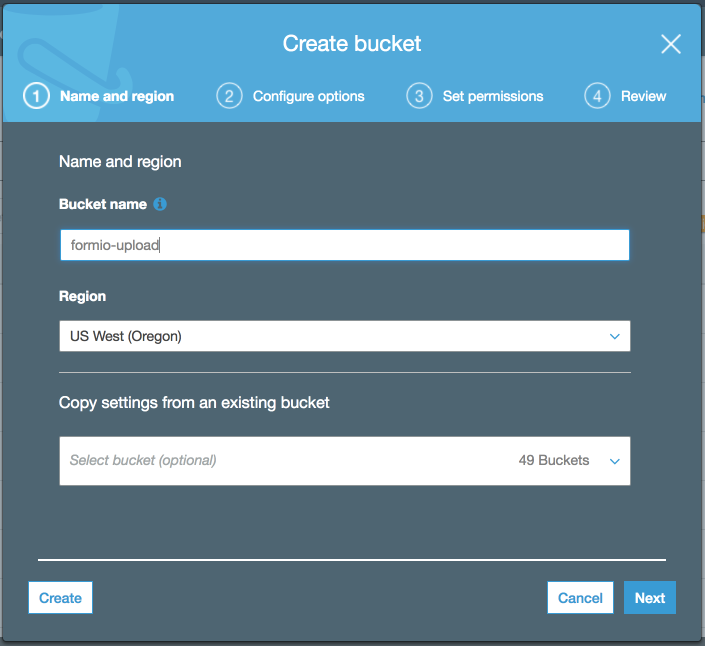
Click Next for all the other pages of the wizard to complete the creation of the bucket. We can configure all of these options after the bucket is created.
Click on that bucket which will take you to the bucket page. Click on the Permissions tab.
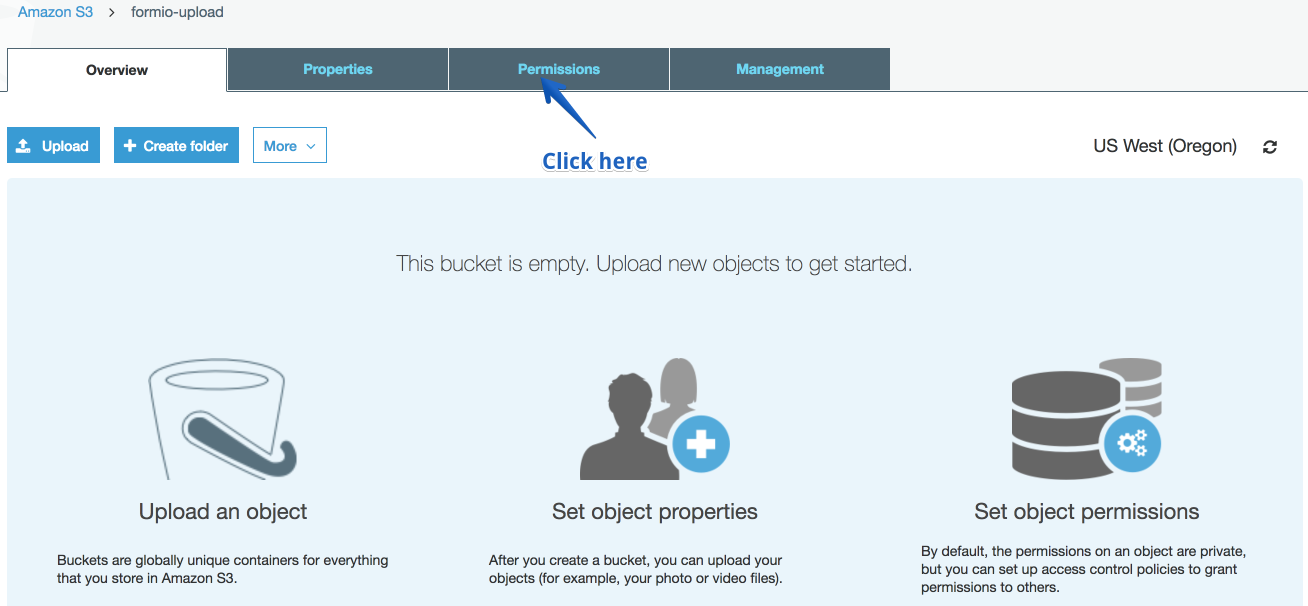
Now, click on Bucket Policy button and then add the following policy to your bucket.
If you wish to have Public Read access to your files, then you will need to add the following rule to your policy.
So that it looks like the following.
Important Note You will need to make sure you replace the
arn:aws:iam::XXXXXX:user/S3with the ARN you copied when you created the user, and also replace theformio-uploadwith the name of your new bucket.Next click on CORS configuration and add the following.
You may replace
"AllowOrigins": ["*"]with the domain names of the sites your app will be running on or leave it open.Make sure you save the configuration and the bucket settings.
S3 Bucket Encryption (optional)
Form.io also supports S3 Encryption to provide further safety with the files that are stored within the S3 system. If you wish to enable this feature, you can do so by click on the Properties tab, then click on Default Encryption and then provide the encryption you would like to use.
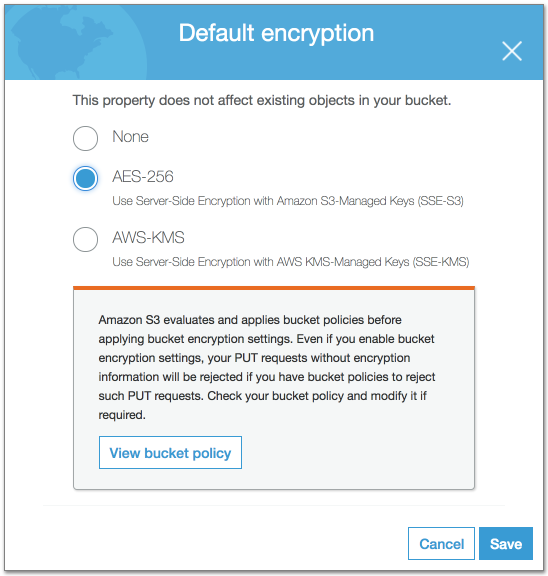
Your S3 bucket should now be properly configured.
Enter S3 Project Settings
On form.io go to your Project Settings page and Click on Integrations ❘ File Storage ❘ S3 Storage
Enter the information for the IAM user and S3 bucket you just created. Make sure to provide all the necessary configurations that match the setup that you configured. For example, like this.

The following credentials can be provided.
Setting
Description
Example
Use MinIO Server
Check this if you would like to use these settings to connect to a S3 compatible server
Access Key ID
This is the IAM user Access Key ID that you copied when setting up the S3 user.
ALIAQIQUCRXQ7Q2I8UYQ
Secret Access Key
This is the IAM user Secret Access Key that you copied when setting up the S3 user.
IykVuiJPYidDhTWyFSfyIOVXuX7tIwIpCC3Sqql/
Bucket Name
The name of the bucket you created.
formio-upload
Bucket URL
If you are using your own S3 compatible server, then provide the url here.
https://formio-upload.s3.amazonaws.com/
Bucket Region
The region which you setup your Bucket within
us-west-2
Starts With
This is the top-most folder you wish to place all the files from this project within.
files/
Access Control List
Determines the Access Control of the files within this bucket.
private
S3 Encryption
The type of encryption you are using for this S3 bucket.
AES-256
KMS Key ID
Only valid if you are using KMS encryption where you then need to provide your KMS Key ID
Max Size
The maximum file size for uploads going into this bucket.
100MB
Policy Expiration
The amount of seconds that the Upload policy is valid for
3600
Now make sure to Save the project settings.

Now for every File component that you add to a form, you will need to select the S3 Storage dropdown as follows.
Multipart Upload
AWS S3 offers a Multipart Upload feature that allows users to upload files up to 5TB in size. It can also provide enhanced flexibility when it comes to uploading smaller files. Form.io's File Component supports this feature by letting the form builder opt in to Multipart Upload support on a per form basis.
To use the File Component with Multipart Upload support:
Ensure that your AWS S3 bucket CORS policy exposes the "ETag" header.
In the File Component settings, select the checkbox labeled "Use the S3 Multipart Upload API."
Enter a "part size" in megabytes. The Multipart Upload feature works by "chunking" the file(s) into parts as close to this size as possible. Although this field is required, you can enter your best estimate based on what kinds of files you believe your form users will be uploading. If the file happens to be smaller than the chunk size, Form.io will use a "best-guess" part size to upload the file, so don't worry about being too precise.
SeaweedFS
If the Form.io Platform was deployed to the environment with the docker-compose methodology, SeaweedFS is already included in the deployment, and manual installation is not required.
Pre-Requisites
To deploy a new SeaweedFS server, complete the following pre-requisite steps:
Install Docker either on the local machine, or on a private cloud server.
Create the necessary directories to store files using the file browser, or by executing the following commands:
Run the following command to pull the SeaweedFS container from Docker Hub:
Deploying the SeaweedFS Container
Execute the following command to start the SeaweedFS container:
Note that the sample credentials "CHANGEME" should be updated to reflect the credentials intended for access to the file storage.
In this example, note that SeadweedFS is mounting the folder ~/seaweedfs. This can be changed to any drive on the system machine where SeaweedFS should store files.
Verify the formio-seaweedfs container is running by executing the following command:
The result should look similar to the following:
Modify the
hostsfile to allow easy access to SeaweedFS:On MacOS/Linux: From the terminal run the following command, logging in if prompted:
On Windows: Use Notepad as an Administrator to open the file
C:\Windows\System32\Drivers\etc\hosts
Start the admin portal with the command:
In a browser, navigate to http://seaweedfs:23646/ ( or http://localhost:23646) to view the SeaweedFS interface.
After successfully loading the SeaweedFS dashboard, navigate to Buckets under the Object Store tools on the left-hand menu.
Create a new Bucket by clicking on the +Create Bucket button. Give the bucket a descriptive name and record the choice for future configurations.
The SeaweedFS Server should now be operational.
Using NGROK for local testing (Optional)
To test this capability locally, the tool NGROK can be used to create a web accessible proxy to the local host. Create an NGROK account and install the application, then run the following command to create a secure web tunnel to the localhost:
Form.io Configuration
Once SeaweedFS Server is running, configure the Form.io Platform settings to point to the running SeaweedFS endpoint in the Form.io Project settings. Complete the following steps:
Open the project in the Form.io platform.
Open the Settings menu from the left-hand pane.
From the Settings menu, navigate to Integrations > File Storage.
On the Amazon S3 tab, check the Use MinIO Server box.
Configure the SeaweedFS settings as follows:
SeaweedFS Server URL- http://seaweedfs:8333 Form.io may display an error requesting a complete URL. It can be disregarded; the settings can be saved despite the warning.
Access Key ID- Enter the value specified for
AWS_ACCESS_KEY_ID.Secret Access Key- Enter the value specific for
AWS_SECRET_ACCESS_KEY.Bucket Name- Enter the name of the bucket created in the SeaweedFS dashboard.

Press Save to save your settings.
Create a Form that uses SeaweedFS
To verify file storage has been correctly integrated, create a new API Web Form that has a File component.
After dropping the File component on the Form, open the configuration options. Open the File tab and verify that Storage is set to S3.

Use the Form to upload a file. Verify that there are no errors on the Form, and that the file is placed in the SeaweedFS bucket as expected.
Google Drive
Google Drive allows for external applications to create and update files within the Google platform. Before File Storage can be configured for Google Drive, you must first establish a connection between the Google Developer Cloud and Form.io. Follow the File Storage steps below once the Google Drive configuration is complete.
Click Here for documentation on how to integrate Google Developer Cloud with Form.io.
Within the Form.io Project, navigate to the Google Drive file storage settings Settings > Integrations > File Storage > Google Drive
Click the Enable Google Drive button to configure the storage integration

Add a File Component to your form
Click the File tab
Select the Google Drive from the Storage dropdown

File Folder
If you want to route your file uploads to a specific folder in your Drive, simply add the Folder ID found within the URL to the Folder ID setting within the File component.
Navigate to your Google Drive folder
Copy the Folder ID within the URL

Add the ID to the Folder ID field within the File Component settings.

Last updated
Was this helpful?
